Breaking: PS6 Hardware Leaks — May 2026
Major PS6 leaks have emerged with detailed hardware specifications. Key upgrades include:
- PCIe Gen5 SSD: 14,900 MB/s sequential read — double the PS5's 7,500 MB/s speed. Virtually eliminates all loading times.
- AMD Orion APU: 34-40 TFLOPS GPU with RTX 5090-level ray tracing performance.
- PSSR 2.0: Next-generation AI upscaling with frame interpolation pipeline currently in development.
- SAVANT Controller Tech: Revolutionary haptic matrices with synchronized linear actuators. Sony has also patented a controller without physical buttons.
- PS6 Portable: Rumored handheld with Canis APU, RDNA5 graphics, up to 48GB RAM, and PS4/PS5 backwards compatibility.
- Launch Window: Most experts expect 2027 launch alongside Microsoft's Project Helix. Bloomberg reports possible delays to 2028-2029 due to global memory crisis driven by AI demand.
- Next-Gen Horror Game: Sony reportedly developing a third-person horror shooter on Unreal Engine 5 — possibly Until Dawn 2 or a new Siren game from Firesprite.
PlayStation 6 Guru Guide
Master PlayStation 6 with expert guidance. Access comprehensive tutorials, advanced gaming strategies, technical help, and insider knowledge from PS6 gurus. Whether you are setting up your console for the first time, trying to squeeze out every frame of performance, or brave enough to open up the hardware and repair it yourself — this is your definitive resource.
PS5 Repair Videos — Watch & Learn
The best way to learn hardware repair is by watching experienced technicians do it. Click any thumbnail to watch on YouTube. These PS5 repair and teardown videos cover everything from full disassembly to HDMI port soldering — directly applicable to PS6 when it arrives.
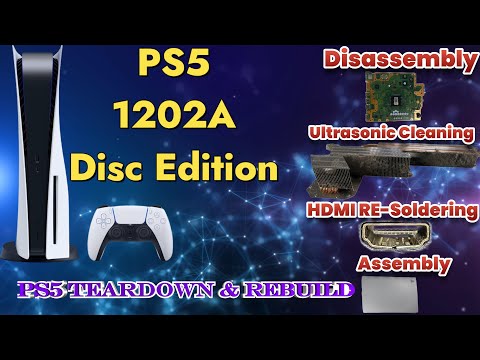
Full Teardown & Disassembly
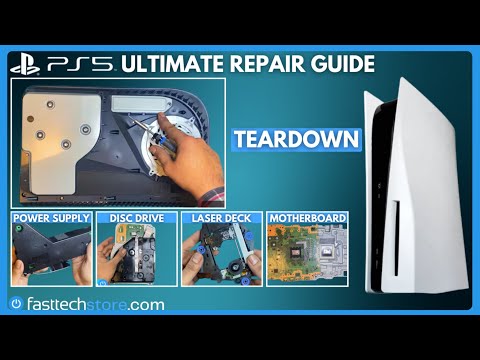 PS5 Teardown & Disassembly Guide
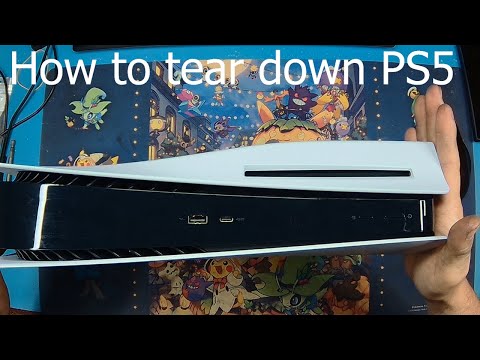
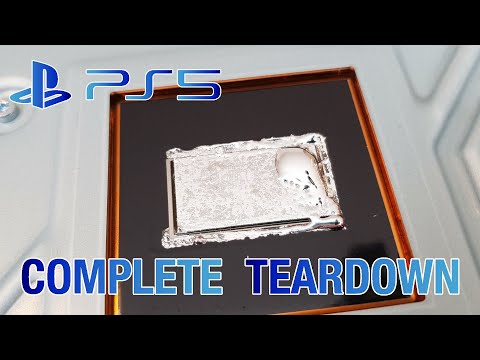 Launch Day PS5 Full Teardown
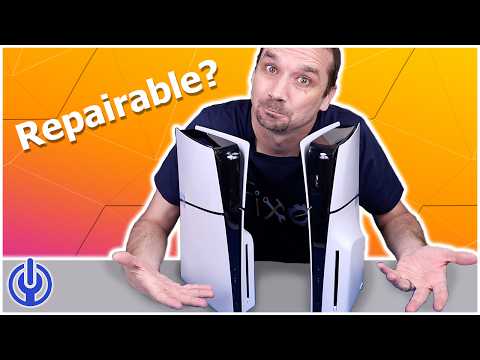
 PS5 Teardown — Repairability Perspective
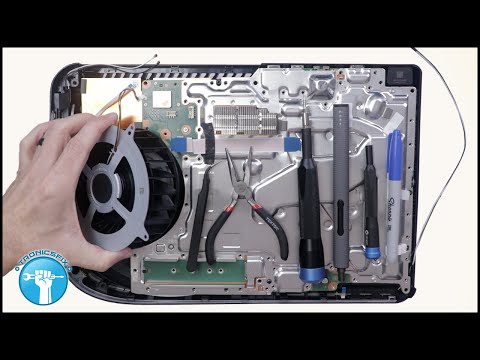
 PS5 Slim — Detailed Teardown
Dust Cleaning & Overheating Fixes
 PS5 Disassembly & Dust Cleaning
 PS5 Full Restoration Guide
 How to Disassemble PS5
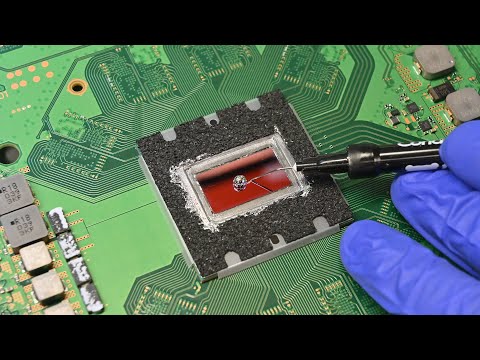
Thermal Paste & Liquid Metal Replacement
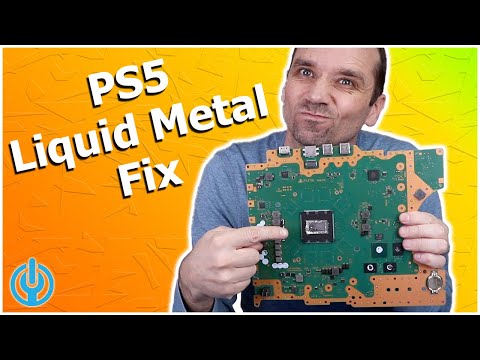 How to Fix the PS5 Liquid Metal Problem
 PS5 Repair & Maintenance — Liquid Metal
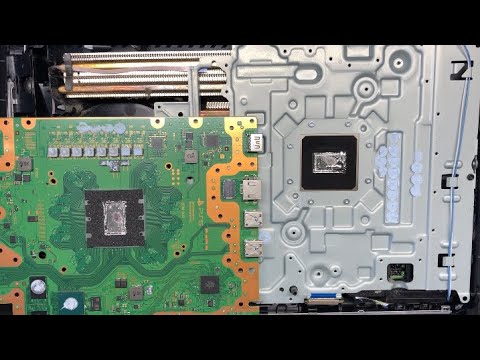
 Fix PS5 HDMI & Replace Liquid Metal
HDMI Port Repair
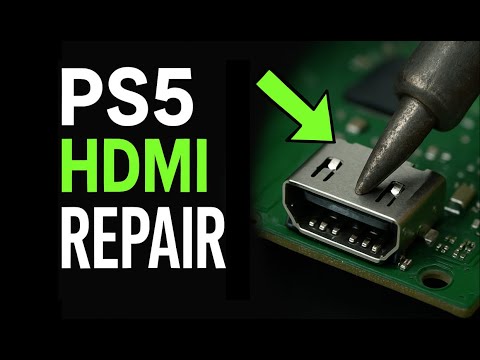 How We Repair PS5 HDMI Ports Every Day
 PS5 HDMI Port Repair — How To
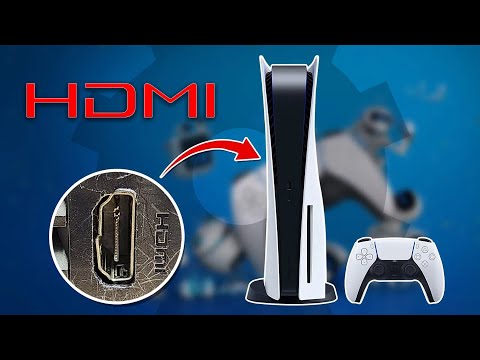 PS5 HDMI Port Repair — Avoid My Mistake
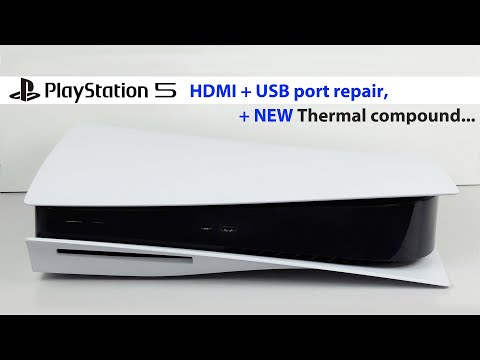 PS5 HDMI + USB Repair + New Thermal Compound
Essential PS6 Tips & Tricks
Getting the most out of your PlayStation 6 starts with the basics, but the rabbit hole goes deep. Here is what every PS6 owner should know:
- Enable Performance Mode: In Settings → Screen and Video → Video Output, switch between Performance Mode (high frame rate, up to 120 fps) and Resolution Mode (4K/8K fidelity). For competitive multiplayer, Performance Mode wins every time.
- Set Up Two-Factor Authentication: Protect your PSN account immediately. Go to Account Management → Security → 2-Step Verification. A compromised account means lost purchases and trophies.
- Use Rest Mode wisely: Enable "Stay Connected to the Internet" and "Enable Turning On PS6 from Network" in Rest Mode settings. Downloads continue, and Remote Play stays available 24/7.
- Set a primary console: Designating your PS6 as your primary console lets every user on that system play your digital library — extremely useful in a household with multiple players.
- Manage storage proactively: Games can exceed 100 GB. Use Settings → Storage to sort by size. Move less-played titles to extended USB storage, keeping your fastest internal NVMe SSD for your current games.
- Customize DualSense haptics per game: Haptic feedback intensity and adaptive trigger resistance can be tuned globally in Settings → Accessories → Controllers, or overridden per-game in the game's own options menu.
- Use Game Help and Activity Cards: Press the PS button and look at Activities. Built-in hints and video walkthroughs appear directly on-screen without leaving the game — no more alt-tabbing to YouTube.
- Trophy timestamps and hunt smarter: The Trophy list shows times earned. Use this to track your fastest runs or confirm trophy unlock order when troubleshooting a missed platinum.
- Pre-download games before release: Pre-ordered titles are downloaded the day before launch and locked until the release moment. You are ready to play the instant it goes live.
- PartyShare screen share: Share your screen directly with party members without a capture card. Great for getting live help from friends on difficult sections.
- Use the built-in VPN awareness: PS6 detects latency spikes on your connection and recommends switching to a wired Ethernet cable. Always prefer a wired gigabit connection for online play.
- Remap any button: Settings → Accessibility → Button Assignments lets you fully remap the controller — swap L2/R2 triggers, move any face button. Invaluable for accessibility or personal preference.
Performance & System Optimization
Squeezing every drop of performance from your PS6 involves both software settings and physical environment choices.
- Rebuild the Database: If menus feel sluggish over time, boot into Safe Mode (hold the power button for ~7 seconds until you hear a second beep) and select "Rebuild Database." This reorganizes the internal file system and noticeably speeds up the UI. It does not delete any data.
- Keep ventilation clear: The PS6's cooling system is aggressive, but it still needs 10–15 cm of free space on all sides. Never put it inside a closed cabinet. Heat is the single biggest enemy of long-term hardware health.
- Vacuum the side vents every 3–6 months: Use a low-power vacuum or compressed air briefly at the intake vents (do not insert nozzle). Dust buildup dramatically reduces airflow and causes the fan to spin louder and faster.
- Disable HDCP for capture: If you use a capture card for streaming, turn off HDCP in Settings → System → HDMI. Note: some DRM-protected content requires HDCP, so toggle as needed.
- Adjust HDMI device link: Enable "Enable HDMI Device Link" to automatically power your TV on/off with the console. Pair with "Power Off Link" to shut down the TV when the PS6 enters Rest Mode.
- Game Boost for backward-compatible titles: Older PS5 games running on PS6 benefit from Game Boost — higher frame rates and faster loading. Confirm it is enabled for every installed legacy title.
- Delete saved data in the cloud redundantly: PSN offers cloud saves. After finishing a game, back up locally AND to the cloud. If your SSD ever fails, you will not lose progression.
- Use Auto-HDR calibration: The PS6 has a built-in HDR calibration wizard under Screen and Video. Run it every time you change TVs or after firmware updates — HDR profiles can shift.
- Set a spending limit on PSN wallet: Under Account → Family Management, set a wallet spending limit. Prevents accidental large purchases, especially useful with children on the account.
- Update firmware during off-hours: Schedule automatic system software updates for overnight. Large updates (1–3 GB) can interrupt gaming sessions if downloaded manually during play.
DIY Self-Repair Guide for PS6
Important disclaimer: Opening your PS6 will void the warranty if it is still active. Proceed only if the warranty has expired or you are comfortable accepting that risk. Always unplug the console and wait at least 30 minutes before opening — internal capacitors hold charge even after power-off.
Based on the repairability lessons learned from the PS4 and PS5 hardware generations — and Sony's stated commitment to right-to-repair — here is what self-repair on a PS6 will likely look like:
- Tools you will need: A T8 Torx screwdriver, a PH1 Phillips, a PH0 Phillips, a spudger/pry tool set, ESD anti-static wrist strap, thermal paste (high quality, e.g., Thermal Grizzly Kryonaut), and isopropyl alcohol (90%+) for cleanup. A set of tweezers and a magnetic screw tray prevent losing small screws.
- Step 1 — Remove the side panels: PS5/PS6 side panels clip on without screws. Grip a bottom corner, push toward the back of the console, and lift. They require firm and deliberate pressure — avoid flexing aggressively. Panels are cosmetically replaceable and many third-party colored versions exist.
- Step 2 — Clean the fan and heatsink: With panels off, the fan is visible and accessible. Vacuum dust carefully. If the fan is defective (grinding noise, won't spin), unclip the connector and unscrew (usually 3 screws) to replace. Replacement fans cost €15–30 and are widely available.
- Step 3 — Reapplying thermal paste: Over 3–5 years, factory thermal paste dries and cracks. This is the most common cause of thermal throttling and loud fan noise in aged consoles. Remove the heatsink (4–6 screws), clean old paste with isopropyl alcohol, apply a small rice-grain amount of fresh paste to the APU center, and reassemble. This alone can drop temperatures by 10–15°C.
- Step 4 — Replacing the NVMe SSD: The PS6 uses a standard M.2 NVMe SSD slot. Remove one screw, slide out the old drive, and insert the replacement. The console will prompt you to format on next boot. PS5 demonstrated this is designed to be user-accessible, and PS6 inherits that philosophy. Use a PCIe 5.0 NVMe for maximum throughput.
- Step 5 — Disc drive maintenance: If discs are not reading, the laser lens may be dirty. Use a CD/DVD lens cleaning disc or very carefully apply a drop of isopropyl alcohol on a cotton swab and gently clean the laser assembly. If the motor is faulty, the entire optical drive can be replaced as a unit.
- HDMI port replacement: A damaged HDMI port is one of the most common physical repairs. This requires soldering skills and a hot-air rework station. Replacement ports cost €2–5. If you are not comfortable with SMD soldering, use a professional repair service — this repair has a high risk of board damage if mishandled.
- USB port repairs: USB-C and standard USB-A ports can also break from heavy use. Same approach: requires rework station and soldering. Consider this an intermediate repair.
- What NOT to do: Never use a heat gun near the APU without a proper stencil — you risk reflowing solder balls on the main chip. Never overtighten heatsink screws — use consistent torque. Never force a panel that does not come off smoothly; check for a screw you missed.
How to Replace the PS6 Power Supply Yourself
The power supply unit (PSU) is an internal component. Symptoms of a failing PSU include the console not turning on at all, unexpected shutdowns under load, clicking sounds, or a blinking orange power indicator. Before replacing it, first rule out the wall outlet, power strip, and cable by testing with known-good alternatives.
Safety first — this is critical: The PSU contains capacitors that store lethal voltages. Unplug the console, wait at least 30 minutes, and do not probe or short any PSU terminals. Wear an ESD strap connected to a ground (not to the PSU itself).
- Source the correct replacement PSU: Based on PS5 design patterns, the PS6 will likely use a proprietary form-factor internal PSU rated around 350–400W. Match the exact part number printed on the original unit's label. Using the wrong voltage/amperage rating risks permanent board damage. Use iFixit, Amazon, or manufacturer-authorized spare parts suppliers.
- Step 1 — Full disassembly: Remove both side panels, then unscrew and remove the top cover and any shielding plates. The PSU on PlayStation hardware is usually mounted in the rear-left quadrant of the chassis and secured with 3–5 screws.
- Step 2 — Disconnect the power harness: The PSU connects to the mainboard via a flat ribbon cable or multi-pin Molex-style connector. Use a spudger to carefully disengage the retention clip before pulling. Never tug on the cable itself — pull the connector head.
- Step 3 — Remove the AC inlet cable: The external power cable connects internally to the PSU via a short wire with a clip connector. Unclip and note orientation.
- Step 4 — Unscrew and slide out the PSU: On PS5, the PSU slides toward the back once its screws are removed. PS6 is expected to follow the same or a similar slide-out design. Lift it free without bending any nearby ribbon cables.
- Step 5 — Install the new unit: Slide the replacement in, screw it down, reconnect all connectors in reverse order. Ensure every connector is fully seated — a partially connected PSU harness will prevent boot and can cause instability.
- Step 6 — Test before full reassembly: With the console open but with the heatsink/fan properly connected, power it on briefly to confirm it boots. Then shut it down properly, wait 30 minutes, and fully reassemble.
- Cost estimate: Replacement PSUs for PS5 run €40–80 from reputable suppliers. PS6 units will likely be in a similar bracket once the aftermarket matures. Factor in an extra €10–20 for thermal paste and fresh screws if you are doing a full overhaul.
- When to skip DIY: If you smell burnt components or see physical burn marks on the PSU or mainboard, the damage may have already spread. In that case, seek a professional repair shop that can perform board-level diagnostics before you spend money on a new PSU.
Advanced Controller & Accessory Tips
The DualSense and its PS6 successor are among the most sophisticated game controllers ever made. Here is how to get the most out of them:
- Analog stick drift fix: Stick drift is the most common DualSense fault. Before replacing the controller, try cleaning: remove the stick cap, apply compressed air around the base, then a tiny drop of electrical contact cleaner under the rubber boot. This fixes dust-related drift in ~40% of cases. If drift persists, the potentiometer needs replacement — a $5 part, but requires soldering.
- Battery preservation: Keeping the controller fully charged at all times degrades the LiPo battery faster. Charge to ~80% and disconnect via Rest Mode settings. Expect 2–4 year battery lifespan with good habits vs. 1–2 years of continuous full charges.
- Controller update separately: DualSense firmware updates via USB cable. plug in the controller, go to Settings → Accessories → Controllers → Wireless Controller Device Software. Always keep firmware current — Sony patches haptic bugs and stick calibration in these updates.
- Use a USB hub for charging only: A powered USB hub can charge up to 4 controllers simultaneously without stressing a single console USB port. Use a hub with per-port power delivery for best results.
- Headset 3D audio tuning: PS Pulse headsets and any compatible USB headset benefit from the custom 3D Audio profile. Go to Settings → Sound → Audio Output and run the "Measure Room Acoustics" wizard for personalized HRTF (Head-Related Transfer Function) audio that is dramatically better than the generic preset.
Network & Online Play Optimization
Online gaming performance is determined by far more than raw internet speed. Here is how to genuinely optimize connectivity for your PS6:
- Always use wired Ethernet: A gigabit Ethernet cable from your router to the PS6 eliminates Wi-Fi packet loss, jitter, and interference entirely. Even a mediocre 100 Mbps wired connection beats a strong Wi-Fi signal for gaming latency.
- Set a static or reserved IP: Configure your router to assign a permanent IP address to your PS6 via DHCP reservation (by MAC address). This allows reliable port forwarding and prevents occasional "NAT type changed" errors.
- Open NAT (Type 1/2): In your router settings, use DMZ or port forwarding for PlayStation Network ports (TCP: 80, 443, 3478, 3479, 3480 / UDP: 3478, 3479). This ensures NAT Type 2 or Open, improving connection quality in P2P and dedicated server games.
- Use QoS on your router: Quality of Service prioritizes PS6 traffic over background bandwidth consumers like large downloads or video streaming from other devices. Most modern routers support QoS under Advanced settings.
- Use 5GHz Wi-Fi if wired is impossible: If you must use Wi-Fi, use 5GHz over 2.4GHz. Less interference, less congestion, lower latency. Connect to a channel that is not shared with neighbors by checking your router's Wi-Fi analyzer.
- Monitor with the network test: Settings → Network → Test Internet Connection gives you local connection speed, PSN connection, and NAT type. Run this after every router or ISP change to confirm nothing degraded.
Stay Connected to the PS6 Community
Follow us for the latest PlayStation 6 guru updates. Join our growing community of millions of PS6 enthusiasts worldwide. Share repair tips, benchmark results, and gameplay discoveries — the collective knowledge of the community makes every player better.